Superchord manual
Introduction
Welcome
Thank you for choosing lmdsp Superchord.
A lot of research and dedication has gone into the making of this plug-in, and we sincerely hope it will give you entire satisfaction.
Overview
Superchord is a novel effect plug-in which emulates virtual strings resonating in sympathy with the input audio. The strings can be tuned to any pitch, and can also be played live as an instrument, using a MIDI keyboard.
Superchord transforms your sounds into complex, animated textures with an organic quality. It can also be used as a special kind of reverberation to add a touch of ambience to your tracks. Superchord opens a myriad of possibilities for musicians, producers and sound designers alike.
Applications
-
Add virtual sympathetic strings to any instrument such as guitar, piano, etc.
-
Imprint a harmonic layer onto rhythmic loops, preserving source dynamics
-
Get inspired by mutating existing sounds into new material
-
Create otherworldly special FX for sound design
Features
Components
-
12 string resonators with individual and global settings
-
Assignable LFO and envelope follower
-
Filter and saturation modules
-
Dynamics model to tailor string energy characteristics
-
String model parameters to control timbre and other qualities
-
Instrument mode for live playing
Processing
-
Optimized audio engine with 64-bit double precision path
-
Sample accurate automation
-
Glitch-free parameter changes
-
Integrated mini-mixer with solo, mute and defeat functions
-
Dry/wet control with temporary 100% wet audition switch
Controls
-
Deep host integration with direct access to automation (AAX / VST3) and quick control mapping (VST3)
-
Native Instruments NKS FX support for seamless integration with Komplete Kontrol and Maschine
-
Coarse/fine control adjustment using modifier keys
-
Mouse wheel support
-
Convenience functions such as parameter reset, randomize and more through context menus
User interface
-
Scalable user interface with clean 2D vector design
-
HiDPI / Retina aware
-
Preset browser with more than 50 factory presets included
-
Context-aware interaction and help system
-
Selection of graphic skins
-
GPU-accelerated graphics engine for high refresh rates and minimal CPU usage
-
Comprehensive metering for all key elements of the signal chain
Specifications
Audio specifications
-
64-bit double precision internal processing
-
Stereo/mono operation
-
Sampling rate up to 384kHz
Supported formats
-
Avid AAX
-
Apple Audio Unit
-
Steinberg VST2
-
Steinberg VST3
Supported platforms
-
Microsoft Windows 10 to 11 (64-bit)
-
Apple macOS 11 (Big Sur) to 26 (Tahoe)
System requirements
-
Intel 64-bit compatible processor with SSE2 instruction set or Apple Silicon chip
-
2GB RAM
-
OpenGL 3.2 capable graphics
-
1440x900px or 1280x960px or higher resolution monitor
Host compatibility
-
Pro Tools 2019.5 and above
-
VST, VST3 or AU 64-bit compatible host
-
Maschine 2.7.3 / Komplete Kontrol 2.0 or above for optional NKS FX support
Please visit our online FAQ section for the latest host compatibility information.
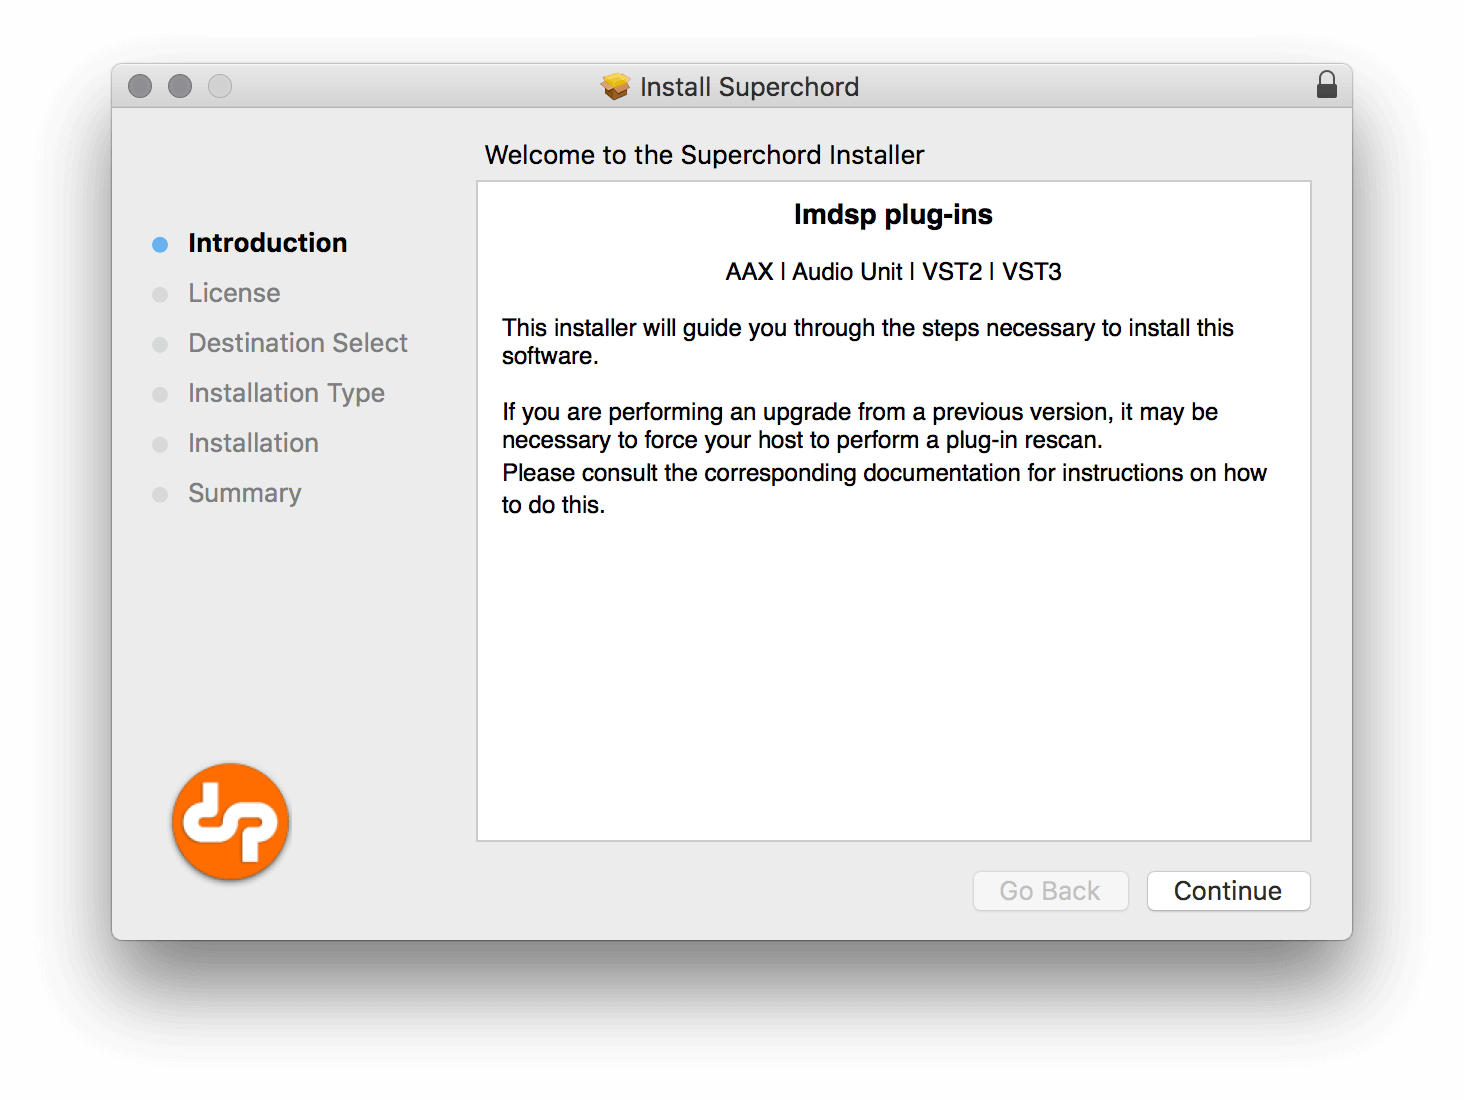
Installation
The latest installer can be downloaded from the download area.
Windows
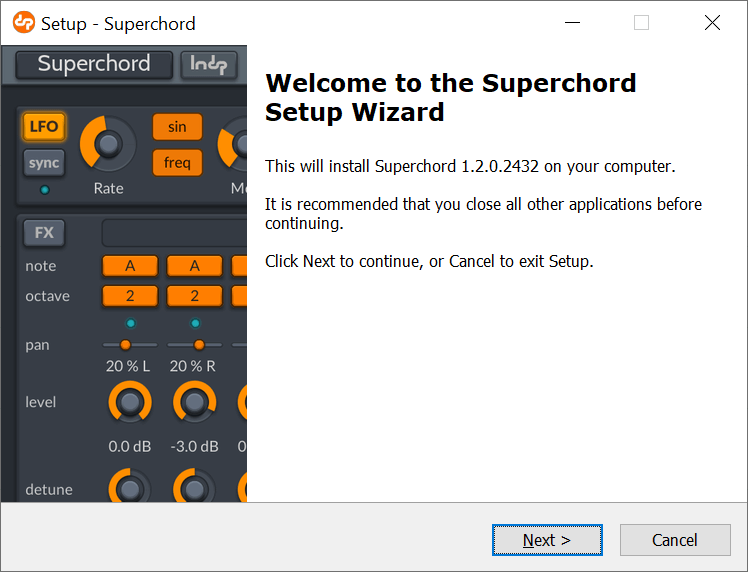
Double-click the Superchord_setup_1.2.5.6567.exe file to start the installation process.
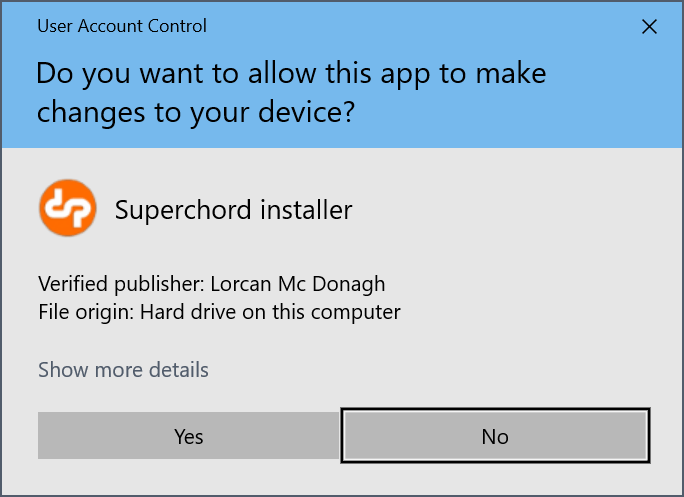
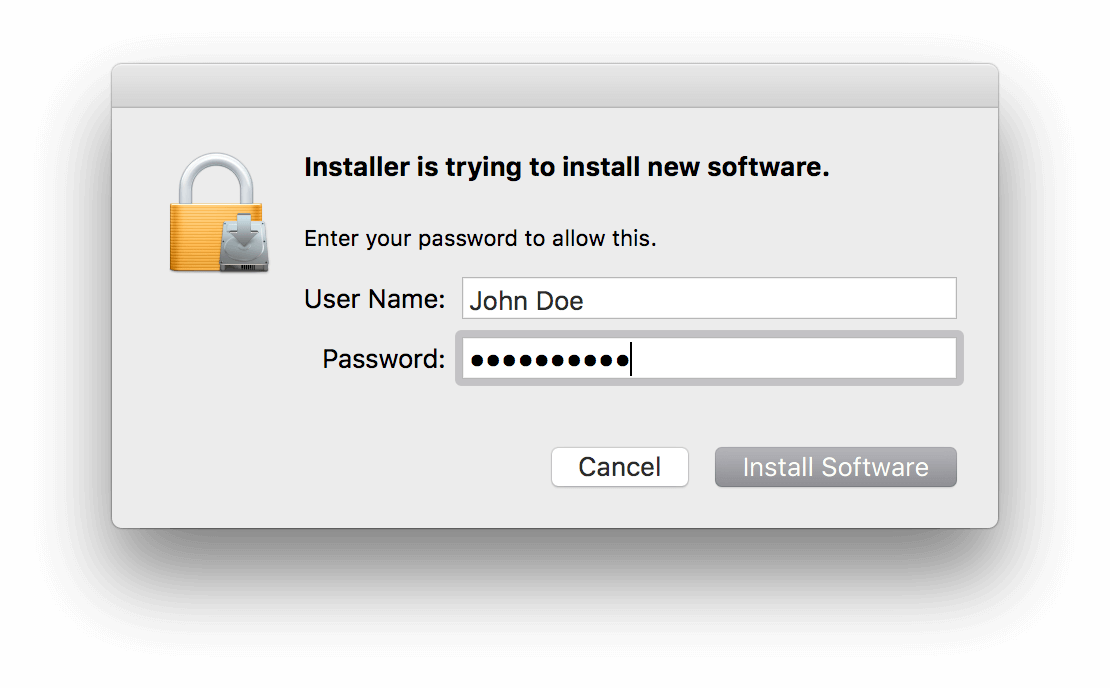
User Account Control
The installer requires the current account to have administrative privileges, which will trigger the Windows User Account Control dialog as pictured below.
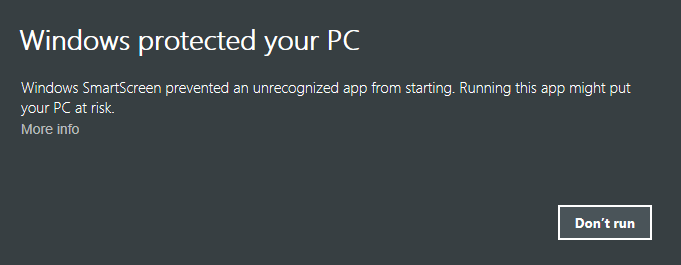
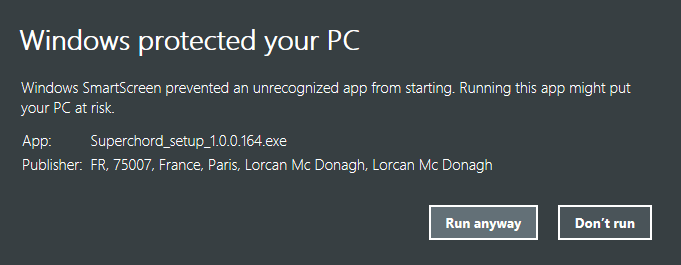
SmartScreen
An annoying Windows SmartScreen warning dialog can also sometimes be displayed.
We guarantee that our software is absolutely virus and spyware free, and you can safely ignore the warnings. You can use the free VirusTotal online service to check your installer should you still not take our word for it.
Please click More info on the right then Run anyway to proceed.
Installation sequence
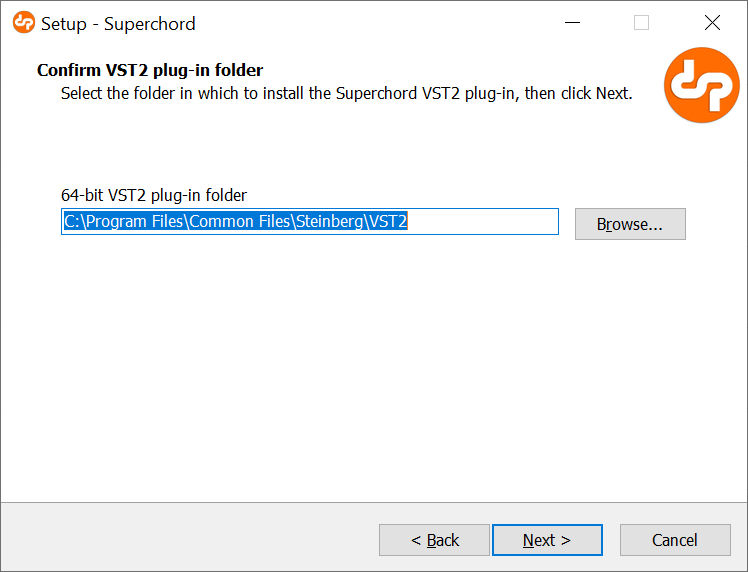
The following screen allows you to customize the folders to which the VST2 versions of the plug-in will be installed. The default values should be fine for most cases, but you might to change them in case your host uses non-standard locations.
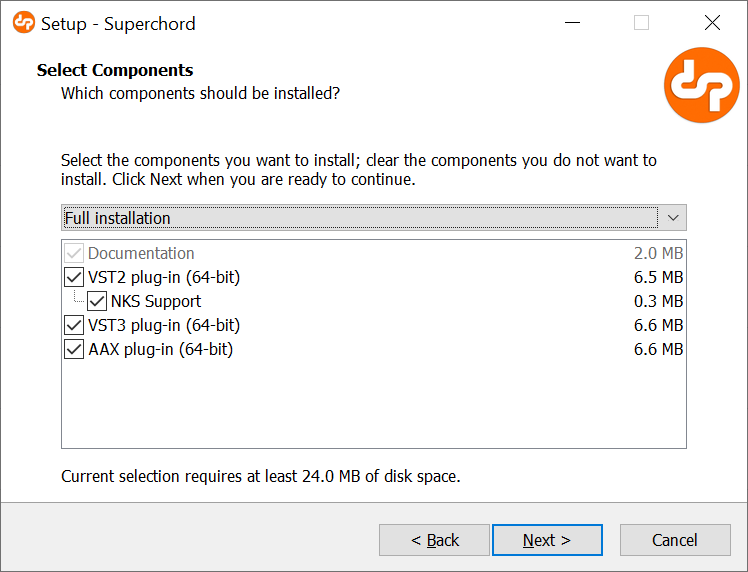
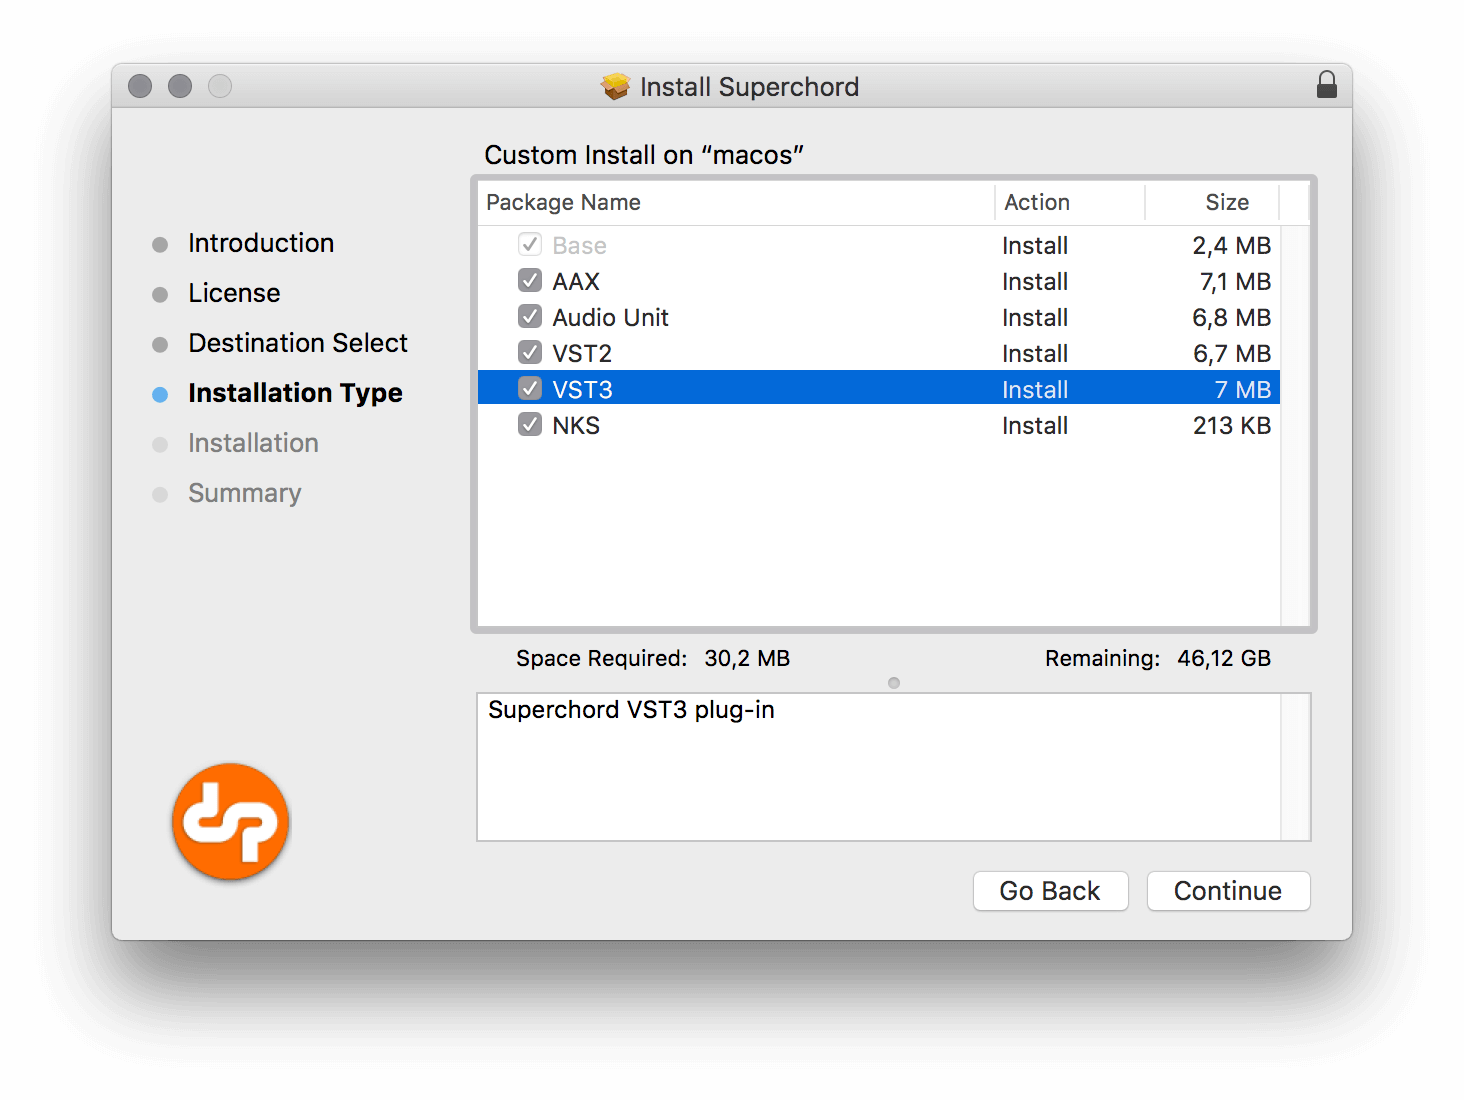
The following screen lets you choose which plug-in formats you want to install. Here are few guidelines:
-
VST3 versions offer more features than their VST2 counter-parts, but some hosts don’t support VST3 yet.
-
AAX versions are only supported in Pro Tools 11 or above.
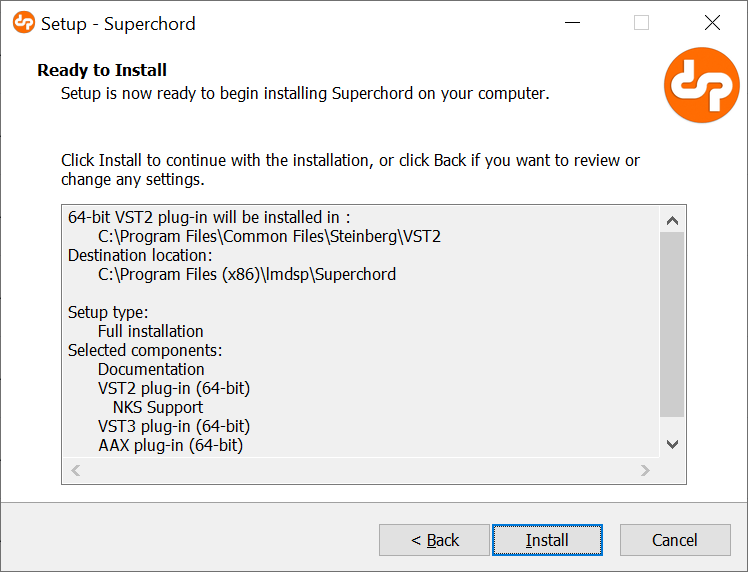
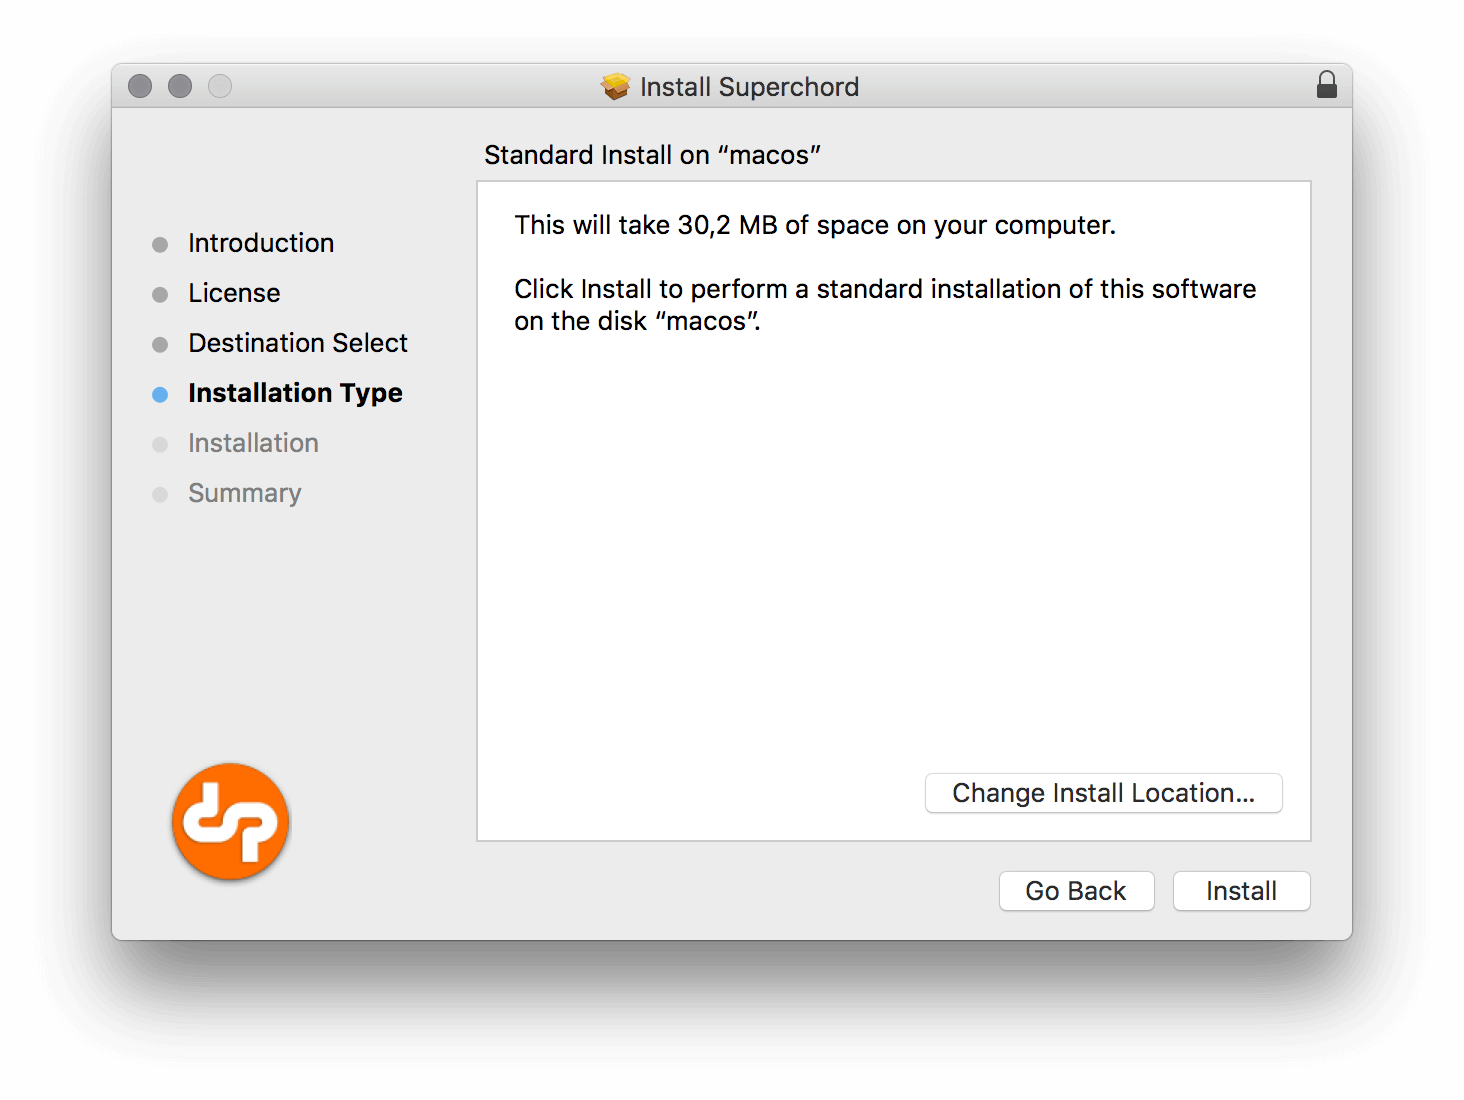
You will then be presented with a summary of the installation options.
Press Install when you are ready to perform the actual installation.
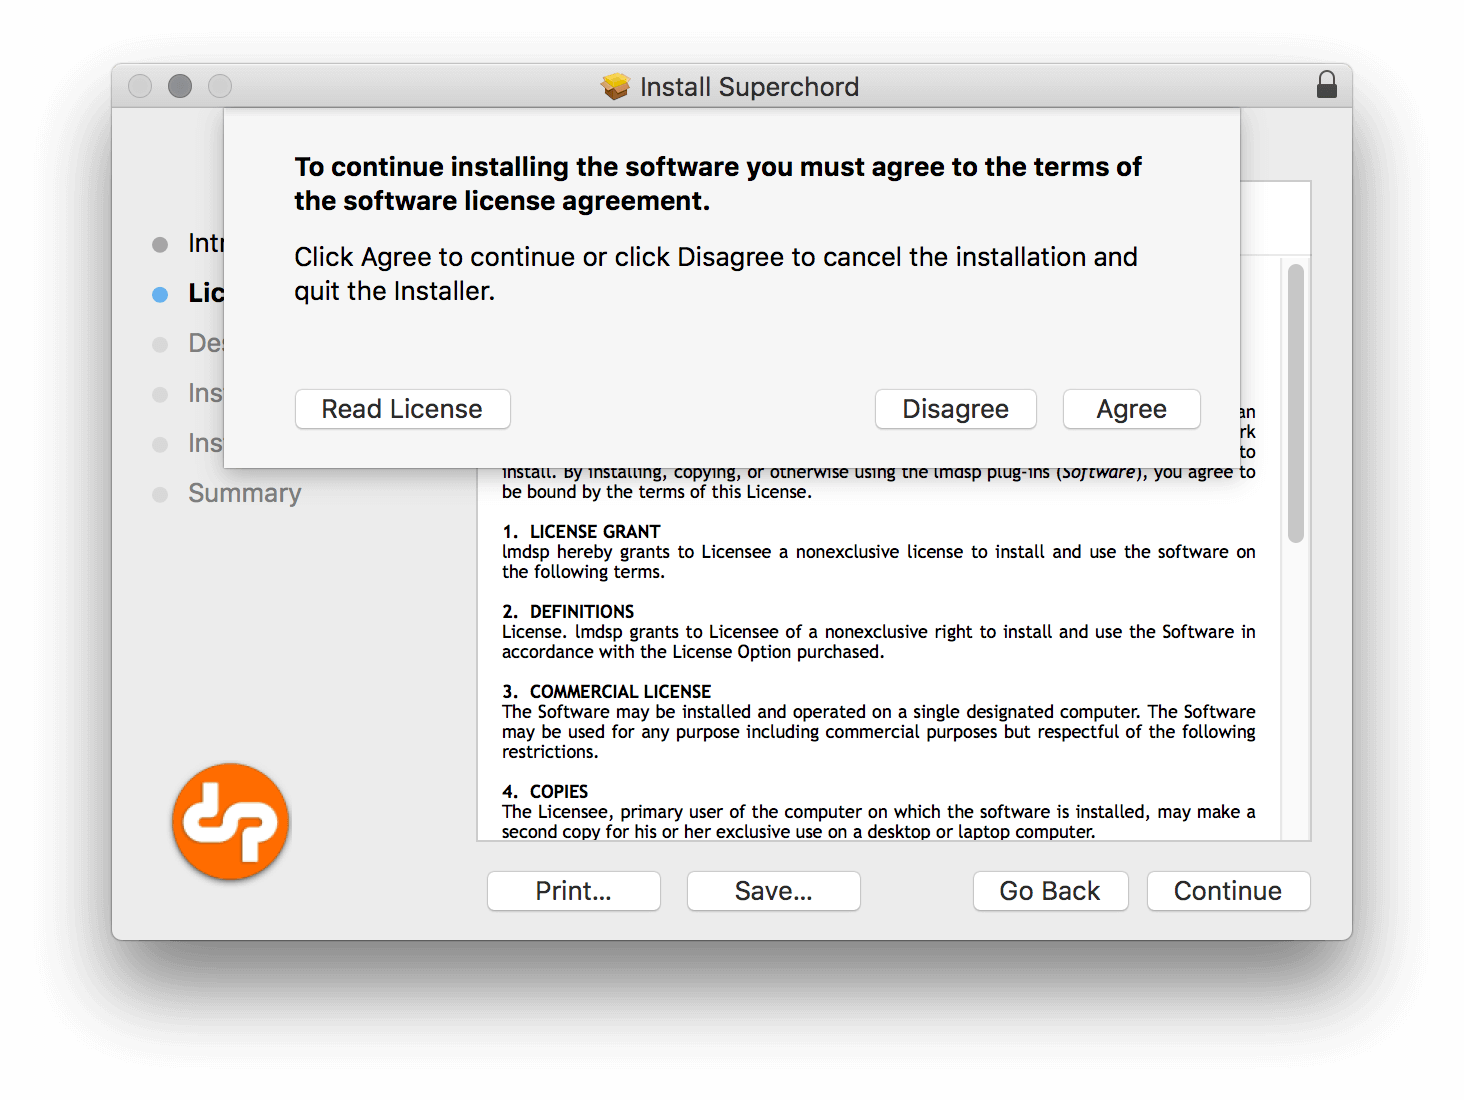
macOS
Double-click the Superchord_setup_1.2.5.6567.pkg file to start the installation process.
Installation sequence

You will then be presented with a summary of the installation options.
Press Install when you are ready to perform the actual installation.
Depending on your system preferences, you will be asked to enter administrator credentials.
Updating
Whenever you download a new version, you don’t need to uninstall the previous version beforehand, and you can just repeat the installer process.
On Windows, you can uninstall the program by going to .
Authorization
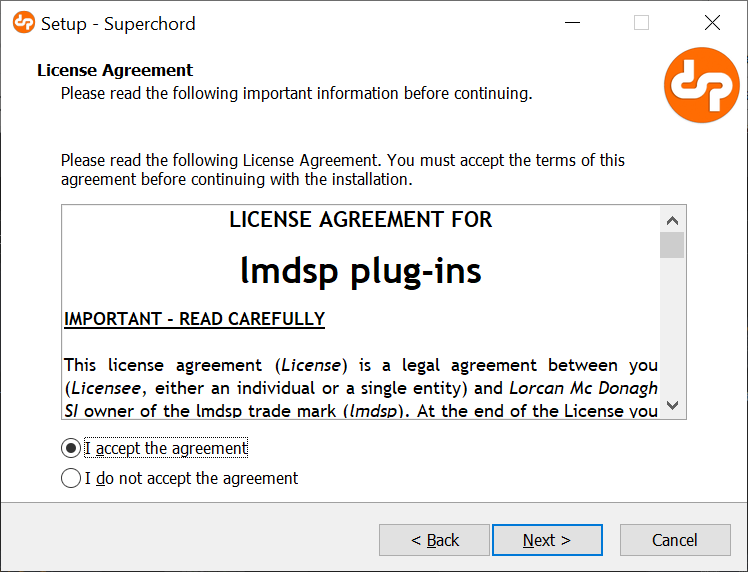
The plug-in runs in demo mode until you authorize it with a license file.
In demo mode, presets cannot be saved nor recalled, and a nag screen appears now and then.
When you have purchased a license, please go to your user account to download the corresponding license file, then save it in a safe place on your computer.
Launch your favorite host and add an instance of the plug-in, then click on the setup button located at the right of the toolbar.
Click on the Register button at the bottom-left of the setup screen, then select your license file in the file dialog, and finally press OK to load the license file.
You can unregister the software at any time by clicking the Unregister button.
|
The license grants you the rights to use the plug-in on one computer at a time. You can therefore authorize both your laptop and desktop computers, as long as you are the sole user. This applies to individuals only. Companies and institutions should purchase one license per seat. |
User interface basics
Changing parameters
Rotary controls use the so-called linear mode by default, meaning that they respond to up, down, left and right movements. If your VST2 / VST3 host has a rotary mode setting, this will be used instead.
All controls except switches and buttons also respond to mouse wheel movements,
which you might find to be faster and easier than clicking with the mouse.
When you hover over a control or change its value, its label will turn into a numeric display,
revealing its current value and its corresponding unit of measurement (Hz, dB, etc.).
Modifier keys
The table below lists available modifier keys. The tooltip area also displays the modifier keys for the host the plug-in is inserted in.
| Function | VST/AU | AAX (Pro Tools) |
|---|---|---|
Fine adjust |
Shift ⇧ |
Control |
Extra fine adjust |
Control+Shift ⇧ |
Control+Shift ⇧ |
Reset value |
Control |
Alt ⌥ |
Keyboards shortcuts
Controls also respond to the arrow keys. Press ▶ or ▲ to increase the value, ◀ or ▼ to decrease it. Use the modifier keys above to make more precise adjustments.
Locking parameters
Parameters can be locked so that they don’t change when switching, loading or pasting presets. You can lock and unlock one or several parameters using the context menu. Right-click the toolbar to unlock all parameters at conce.
Tooltips
Tooltips appear automatically when you hover over an active section of the user interface. They are displayed as a transparent overlay at the bottom of the plug-in user interface.

| Tooltips can be disabled by clicking the info toggle button in the settings dialog, once you know your way around the interface and these become distracting. |
Context menus
|
|
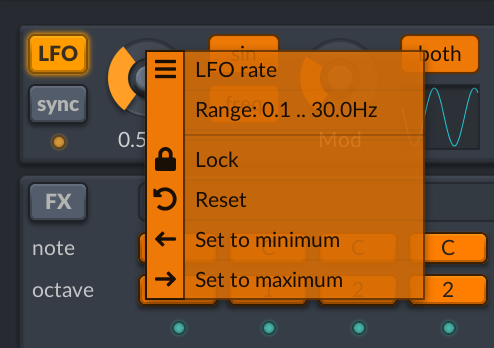
Right-click on a control to bring up a context menu where you can perform a number of useful operations.
| Name | Description | |
|---|---|---|
Information |
Full name, range and unit of the parameter. |
|
Lock |
Prevents the parameter from changing value when switching presets. |
|
Reset |
Sets the parameter back to its default value. |
|
Sets the parameter to its minimum value. |
||
Sets the parameter to its maximum value. |
||
Randomize |
Sets the parameter(s) to a random value. |
|
Tilt |
Applies a random nudge to the parameter(s) current value. |
| For VST3 hosts, use Alt ⌥+Right-click to access the built-in context menu instead of the host context menu. |
Section context menus
The note, octave, pan, level and detune labels located to the right of the corresponding resonator parameters also have specific context menus to apply various useful batch operations.
Host context menu (VST3 / AAX)
The VST3 and AAX plug-in format specifications add some handy functions to access relevant host functions directly from the plug-in interface. These extensions do require support on the host side, but as of today most recent versions of mainstream hosts have implemented them.
VST3 format
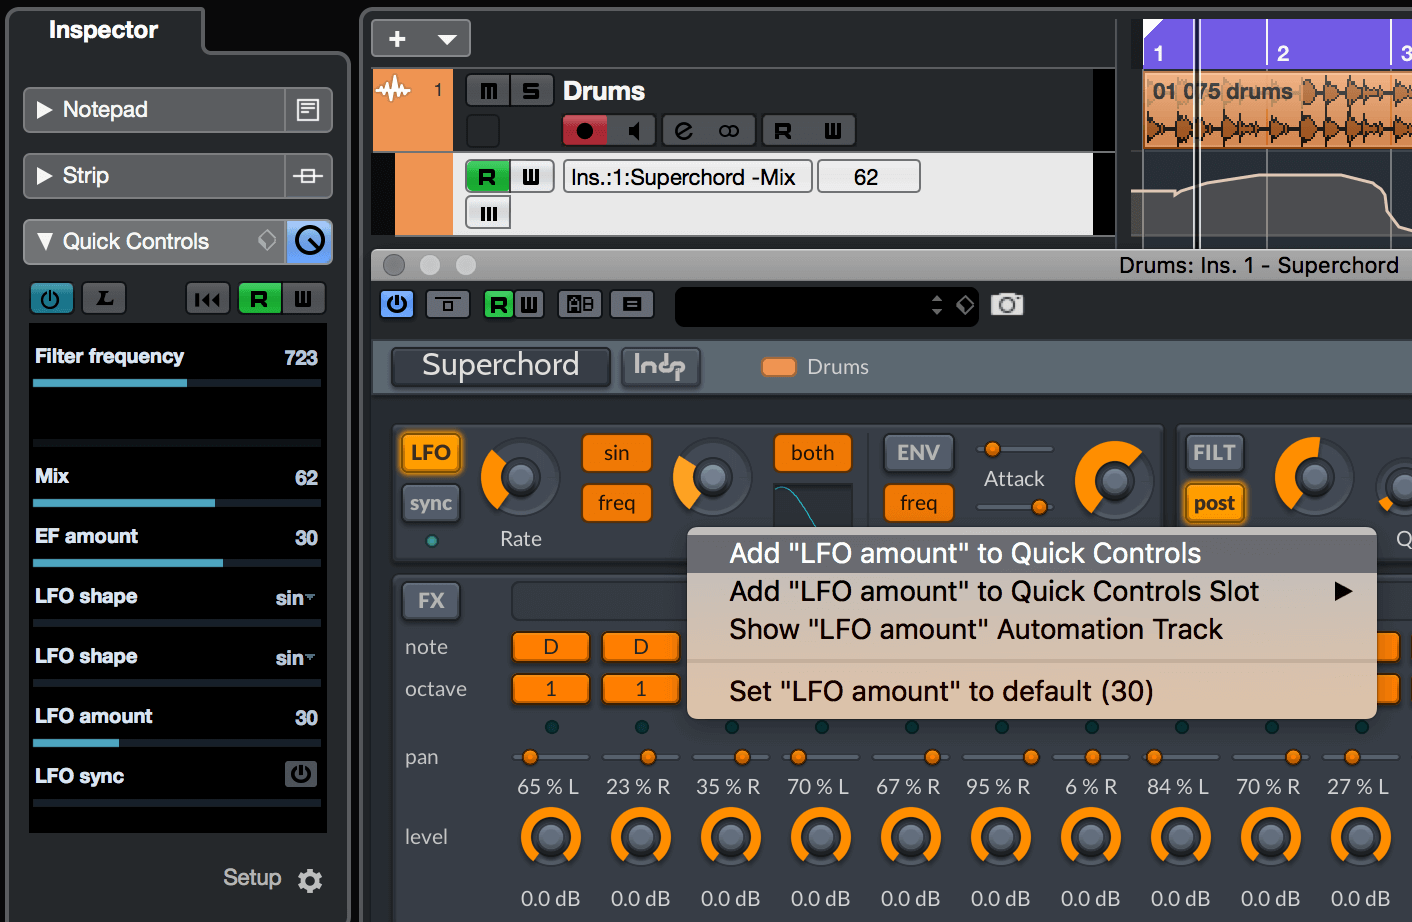
The VST3 host context menu generally incorporates shortcuts to show the automation track for the relevant parameter, as pictured in the next screen.
Cubase and Nuendo also feature specific Quick Controls, which is a very nice feature which allows you to easily map your favorite MIDI controller to up to 8 plug-in parameters. The advantage is that you only need to set-up your MIDI controller once in . After this just right-click on a parameter control to associate it with your MIDI controller, and you’re done.
Please consult the relevant host documentation for more details.
AAX format
Avid AAX plug-ins also feature host command integration with Pro Tools®.

When the mouse is over a control, use the following keyboard shortcuts for the corresponding parameter, as illustrated above:
Function |
Windows |
macOS |
Parameter automation lane |
Ctl+Start ⊞+Click |
Cmd ⌘+Ctl+Click |
Automation context menu |
Ctl+Alt+Start ⊞+Click |
Cmd ⌘+Alt ⌥+Ctl+Click |
Labels for automated parameters turn green in read mode, or red in write mode.
HiDPI / Retina
macOS
Retina high-resolution display is supported in the vast majority of current hosts.
Windows
HiDPI support is available with the following caveats:
-
VST3: a compatible and recent host is required
-
VST2: Presonus Studio One only at the time of writing
-
AAX / Pro Tools: HiDPI is unsupported
-
Mixed-resolution monitor configurations require Windows 10 Creators Update (1703)
Refer our FAQ entry for an up to date list of compatible hosts.
Toolbar

The toolbar, located at the top of the user interface, gives access to the following global functions, from right to left.
| Control | Description |
|---|---|
|
Identifies the plug-in and opens the settings window |
Switches to the previous preset in the current bank |
|
Preset Name |
Click to open the preset manager. Details are displayed in the tooltip area |
Switches to the next preset in the current bank |
|
Copies the current preset to the clipboard |
|
Pastes a preset from the clipboard |
|
Loads a preset from disk |
|
Saves the current preset to disk |
|
Opens the settings window |
Preset management
Preset manager
The preset manager gives quick access to a number of factory presets.
Move your mouse over the preset cells to display information about the corresponding preset.
Click on a cell to immediately switch the current preset, for quick auditioning.
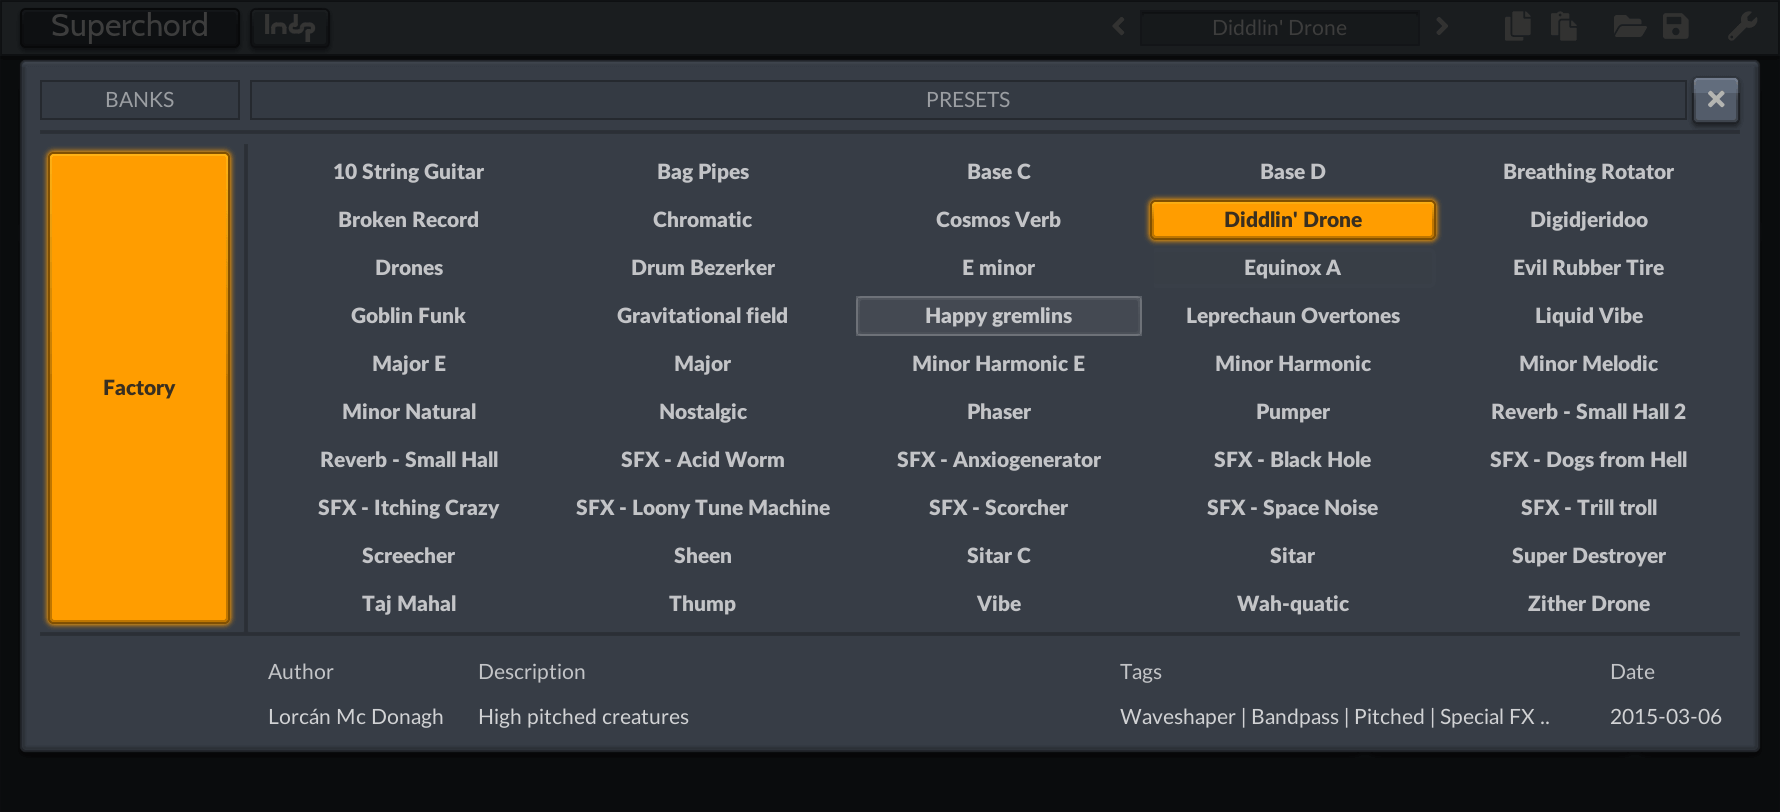
Preset format
Presets are stored in a cross-platform XML text format, so that they can be shared seamlessly between macOS and Windows users, by email, etc. The preset clipboard copy and paste functions allow exchanging presets between instances, and even hosts, if necessary.
Settings
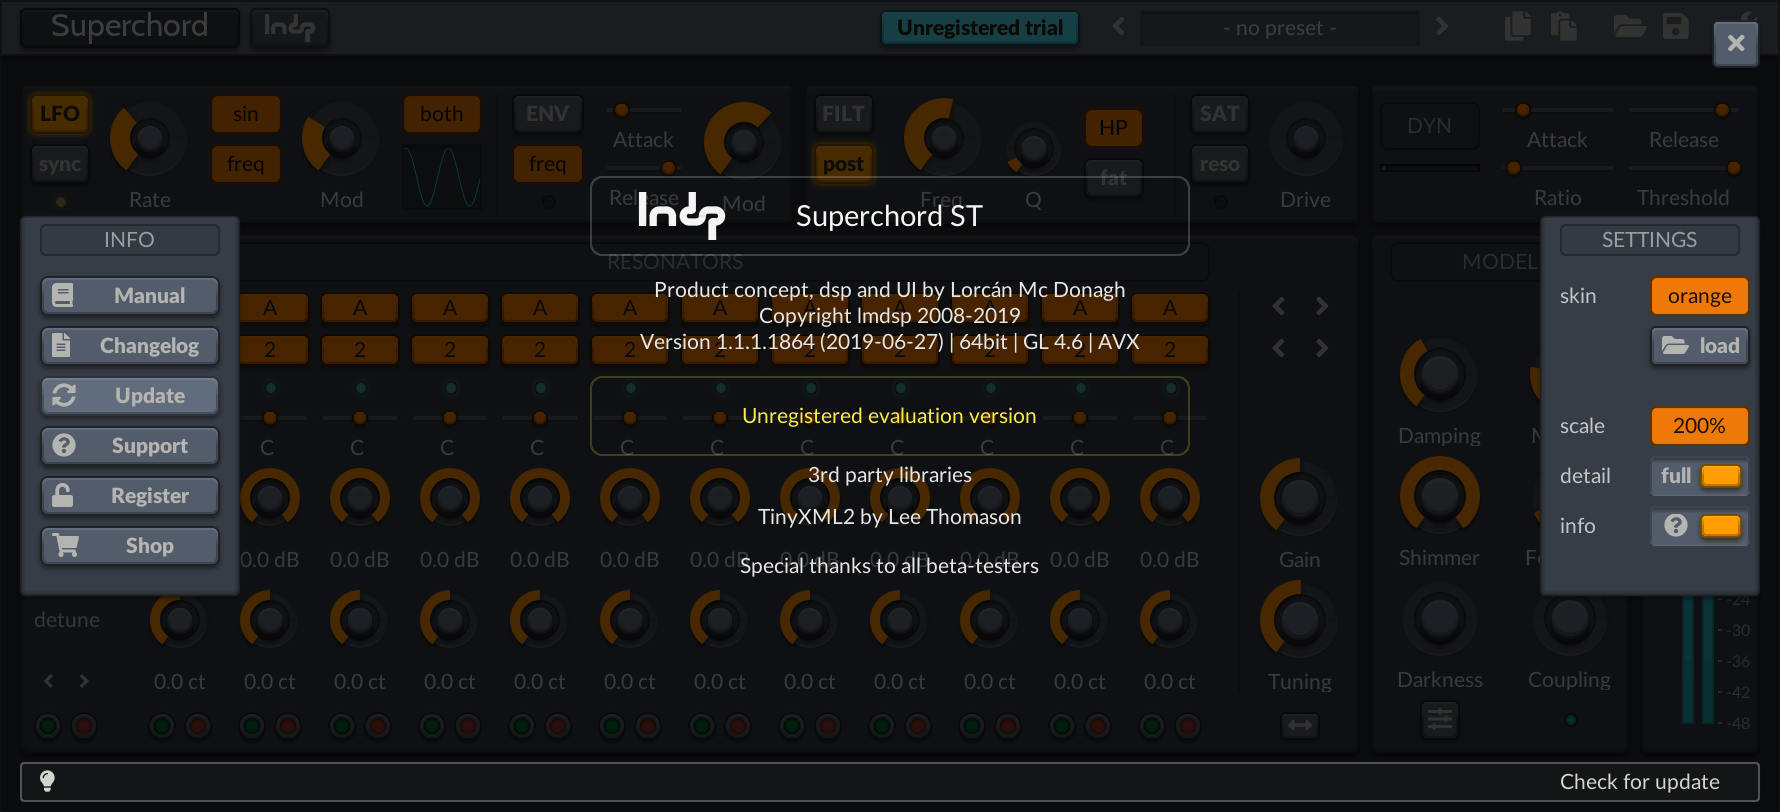
The settings dialog displays information about the product, version, build type and date, etc., at the top-center of the window. Below this, your license status and information is displayed. Finally, you will find a list of third-party libraries used to create this software.
Info
The info panel on the left hosts the following shortcuts and utilities:
| Name | Description | |
|---|---|---|
Manual |
Opens this manual in the default PDF reader |
|
Changelog |
Opens the changelog in the default PDF reader |
|
Update |
Checks if a new version is available (requires internet access) |
|
Support |
Takes you to the online support area |
|
Register |
Opens the license file import dialog (only visible when unregistered) |
|
Unregister |
Removes an existing license (only visible when registered) |
|
Shop |
Takes you to the online shop where you can purchase a license |
Graphic settings
The graphic settings on the right allow you to customize the appearance of the user interface. Unless specified otherwise, these settings are global and are shared across all plug-in instances.
Skin
The overall color scheme can be changed by selecting one of the available skins in the drop-down menu. This is saved on a per-instance basis, so you can use the plug-in color as a quick visual cue.
Click the load button to import a skin from and external definition file. Additional skins will eventually be made available online.
Scale
Choose between various ratios to scale the user interface to your liking.
All current major hosts have been tested and are compatible with this feature.
However, some older hosts may have trouble changing the user interface size on the fly.
Closing and re-opening the plug-in editor will most often fix any graphic glitches you might encounter.
Detail
Click the detail button to toggle between full graphics detail and flat mode. Flat mode reduces all visual candy such as shadows and lighting to a minimum, which can help with less powerful GPU’s such as those integrated in lower-end laptops.
Info
Click the info button to toggle tooltip display on and off.
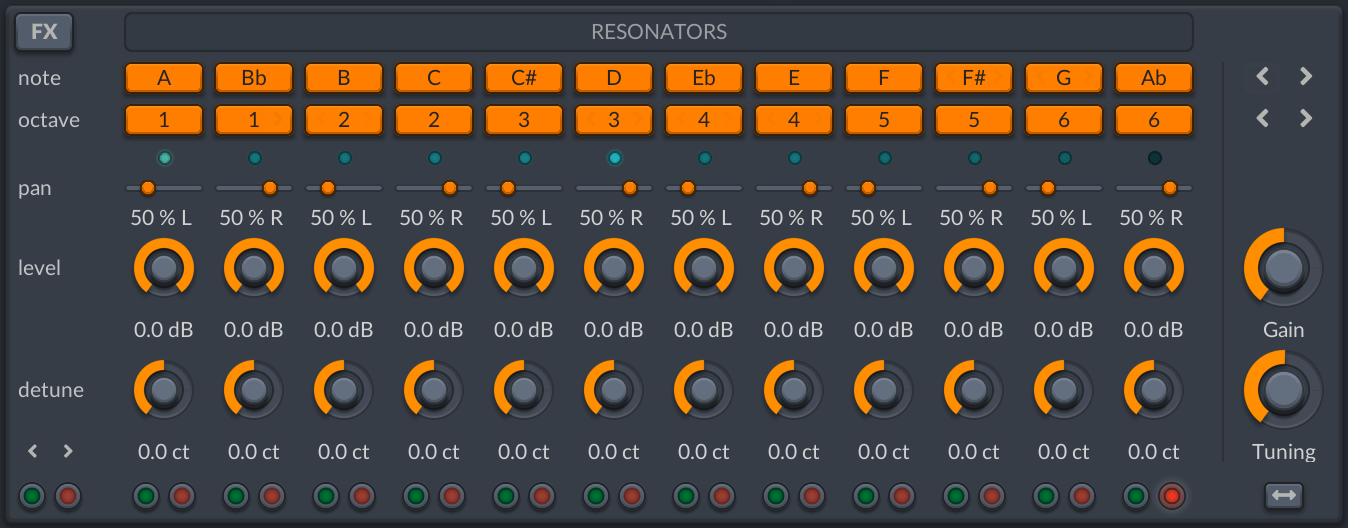
Resonators
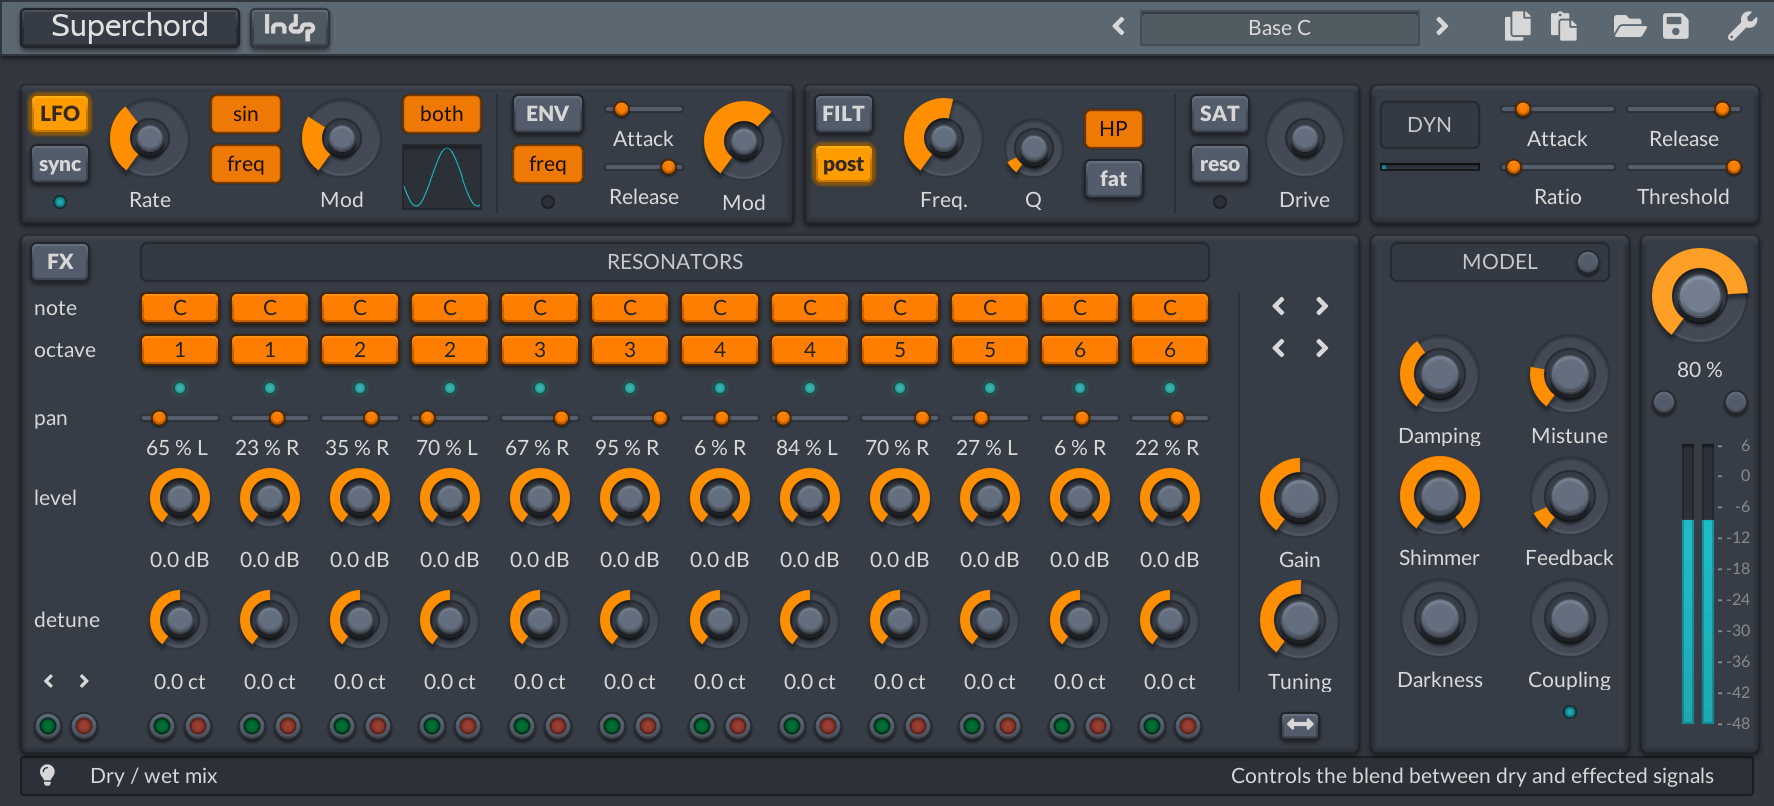
The central area of the user interface is dedicated to the 12 resonators, which are the heart of the sound engine. The tuning of the resonators can be set individually as well globally. While this panel might seem a little crowded and daunting at first, it helps to think of it as a kind of large-scale console, where every resonator is a vertical channel strip with an identical set of controls.
A note about tuning
As Superchord generally produces sounds with an identifiable pitch, it is very important to match the pitches to something that fits with the key of your song. When you feed input content that has no identifiable pitch, such as percussion, the resonator can be tuned to your liking. However, when the input audio is pitched, be it a guitar lick, singing voice lick or else, you will find that the resonators need to be tuned to the key and scale of the phrase, if you want to avoid unpleasant pitch frictions. In effect, the resonators should in effect be treated as any other pitched instrument: they sound definitely better in tune !
Master controls
The following controls, located to the right of the resonators, affect all resonators simultaneously.
Transpose
Click one of these four buttons to shift the notes / octaves of all resonators up or down.
Gain
Adjusts master resonator output gain, after summation of all resonator output signals.
Tuning
Affects master resonator tuning, relative to A4. The default value is standard 440Hz concert pitch.
Tuning range
Click the button below the tuning knob to switch to an extended range of A3-A5 (220-880Hz). This can be used to create dramatic whammy-bar style effects, or to switch between two different tunings on the fly.
Controls
Each resonator has a set of the following individual controls, from top to bottom.
Note
Sets the base note of the resonator.
Click on the right portion of the control to increment the note, on the left to decrement it,
or use the mouse wheel to change the note quicker.
Right-click on the control to display a context menu where you can select a note directly by name.
Octave
Sets the octave of the resonator.
Level meter
This small LED gives an indication of the output level of the corresponding resonator.
Pan
Sets the position of the resonator output in the stereo field.
Level
Sets the level of the resonator output.
Detune
Sets the fine tuning of the resonator pitch, in cents, relative to its base note. The corresponding global context menu has presets for various just intonation tunings.
Solo
Puts the resonator in solo mode, to hear it temporarily in isolation.
Mute
Mutes the resonator, when you don’t need to use all resonators.
| Mute has priority over Solo. |
|
Interesting unison effects can be achieved by setting two or more resonators
to the same pitch (note and octave), and by detuning each of them slightly. You can also spread the resonators over the stereo field using different pan settings to achieve a wider, bigger, fatter sound. Use the tilt and randomize context menu functions to do this with a single click. |
Global context menus
Right-click on any of the note, octave, pan, level or detune labels, located to the left side of the resonators to bring up a series of context menus that affect all resonators globally.
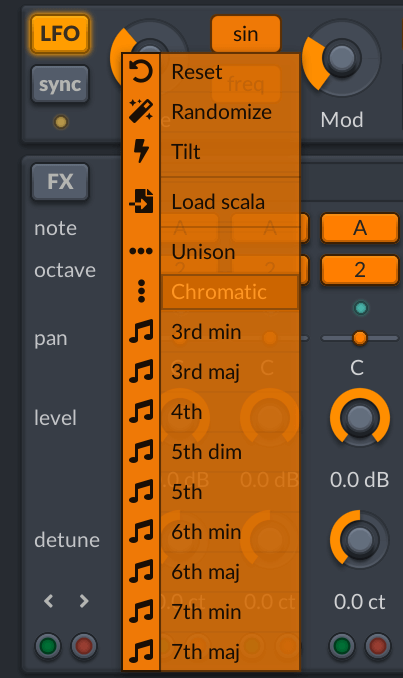
| Name | Description | |
|---|---|---|
Reset |
Resets every corresponding parameter back to its default value. |
|
Randomize |
Sets every corresponding parameter to a random value. |
|
Tilt |
Nudges every corresponding parameter by a small random amount, from its current value. This is useful to quickly obtain a variation of the current settings. |
|
Import |
Import Scala micro-tuning scale definition file |
|
Unison |
Sets all notes to that of the first resonator. |
|
Chromatic |
Sets the resonator notes as a series of chromatic intervals. |
|
Intervals |
Sets resonator notes to the specified interval, repeated as necessary. |
|
Single |
Sets all octaves to that of the first resonator. |
|
Octaves |
Spreads resonator octaves as a series, repeated as necessary. |
Other
Solo/mute defeat
The two solo/mute buttons located to the right of the resonator solo/mute buttons temporarily defeat the individual resonator solo/mute’s states, like on a mixing console. Ctl+Click on one of those buttons to set/clear all solo/mute states in one go.
Detune/frequency/delay toggle
Located above solo/mute defeat controls are two small buttons to switch between resonator detune (default), frequency, and delay modes. In frequency mode, the frequency (in Hz) of the corresponding resonator is displayed instead of the detune amount. In delay mode, resonator detune controls are replaced by individual delay controls. Delaying resonator by different amounts can be interesting to add an extra sense of depth and space.
Model
Overview
Each resonator models a damped vibrating string moving in two so-called separate planes of polarization.
The more damping is applied to a string, the quicker it loses energy at its termination points (bridge and nut),
and the quicker sound fades out.
The model parameters affect the global character of the sound produced by the resonators, as explained in more detail in the following sections.
As you will probably notice, the number of possible combinations is quite large,
so it will take some time to explore them all.
We therefore recommend that you familiarize yourself with Superchord’s possibilities
by listening to the various factory presets,
using those as a starting point to tweak the model parameters
and understand their respective effect on the sound.
Base controls
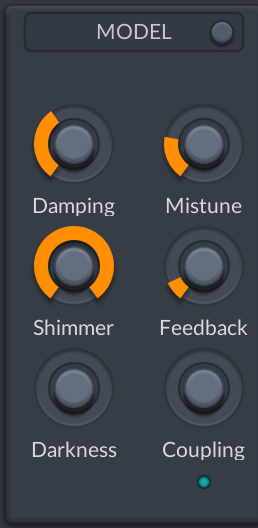
Damping
This parameter affects the overall damping factor of the resonators.
A high damping value prevents most resonance from occurring,
whereas a lower value will make notes ring longer, up to the point of infinite sustain.
This is analogous to the decay time control found in reverb units, except it is inverted.
Shimmer
Shimmer controls how long upper harmonics ring, relative to the fundamental.
This parameter models a phenomenon found in most acoustic instruments,
where harmonics decay faster than the fundamental.
A low shimmer value makes the higher harmonics die out very quickly,
not unlike a guitar player using palm muting.
On the contrary, a high shimmer value will produce a bright scintillating sound.
Darkness
Darkness is essentially a low-pass filter which gradually muffles the sound. This can be put too good effect to tame any excessive harshness.
Mistune
Mistune controls the relative tuning between horizontal and vertical polarizations, in cents.
An ideal string would have both polarizations perfectly in tune,
whereas in real life, depending on the construction of the instrument,
this will not hold anymore.
Small values lead to a kind of double-string, chorus-type effect.
Higher values will give a sound reminiscent of an old honky-tonk piano
or a guitar fitted with washed-out strings.
Feedback
Feedback corresponds to acoustic coupling between horizontal and vertical polarizations. This subtly increases the body and fullness of the sound, and also makes notes ring a bit longer.
Coupling
Coupling refers to the acoustic coupling between strings, or the overall sympathetic resonance.
In the real world, acoustic vibrations recirculate from a string to its neighbors,
which can even lead to acoustic feedback, a.k.a Larsen effect when amplified.
To avoid excessive feedback, prevent damage to your speakers and ears, and model real-world behavior, this feedback is limited by a non-linear element, which emulates things such as amplifier distortion and clipping. This feature can be put to interesting effect and simulate an all-out, everything dialed to 11' guitar amplifier, as demonstrated in the Super Destroyer preset.
The little LED below the dial gives a real-time indication of the overall sympathetic resonance level.
Advanced controls
Click the round button at the top right of the panel to reveal the advanced model control panel. These controls generally have a more subtle effect on the sound, and are intended for advanced users interested in fine-tuning and special effects.
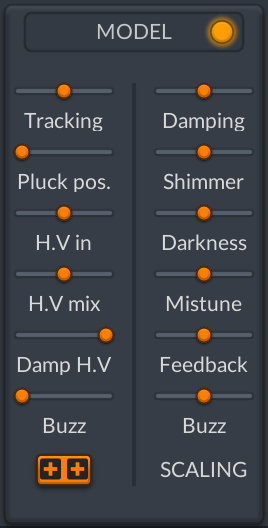
Tracking
When the input audio material contains a lot of low-frequency content, low-pitched strings and harmonics will tend to sound relatively louder than others. The tracking parameter can remedy this by carving out some of this low-frequency content, using a high-pass filter with a cutoff frequency that tracks resonator pitch, to maintain an overall timbral balance.
Pluck pos.
Pluck position simulates how plucking a string at various positions affects the sound. This has a direct effect on which harmonics are excited: for example, plucking exactly at the center leads to even harmonics, giving a characteristic, tube-like hollow sound. Values towards zero correspond to the bridge, whilst one corresponds to the neck.
H.V in
This parameter determines the horizontal to vertical polarization input mix ratio.
H.V mix
This parameter determines the horizontal to vertical polarization output mix ratio.
Damp H.V
This parameter controls the damping of the vertical polarization with respect to the horizontal polarization. In effect, setting this to a value to something lower than 100% will give a more complex decay envelope, comprising two stages.
Buzz
Buzz mimics the characteristic buzzing that occurs in instruments with non-rigid string attachments, such as the Indian sitar.
Polarity
This parameter controls the horizontal and vertical feedback polarities, which can be positive () or negative (). Default is both positive, other settings give a more tubular, bell-like sound with audible inharmonicities.
Scaling
The controls on the right side of the panel modify the target parameter according to the resonator number:
-
0% scaling: value is constant across resonators
-
positive scaling: value decreases with resonator number
-
negative scaling: value increases with resonator number
The following target parameters are available for scaling:
-
Damping
-
Shimmer
-
Darkness
-
Mistune
-
Feedback
-
Buzz
Mixer section
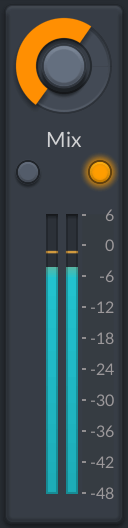
The big mix knob controls the dry / wet amount,
and the reactive meters monitor output levels.
When using little resonator damping and or high Q filter values,
it’s worth paying attention to the output levels for any overloads,
and adjust the master gain knob accordingly.
The two small round buttons below the mix knob there allow listening to the dry (input, right) or wet (effect, left) signal in isolation respectively.
LFO
Usage
The LFO (Low Frequency Oscillator) module modulates target parameters at a periodic rate.
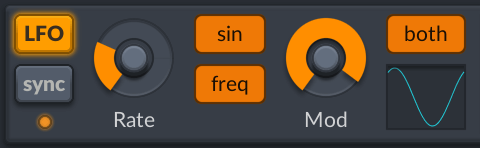
Controls
LFO
Toggles the LFO module on and off.
Sync
This button toggles between two timebase modes:
-
Internal: free running
-
External: synchronized to host tempo
The LED below the sync button pulses in sync with the LFO modulation signal. The oscilloscope shows a graph of the recent LFO history, to help you visualize what you hear.
Rate
Rate controls the LFO speed.
Depending on the sync setting above, its value is expressed in
-
Hertz, with internal sync
-
Musical time sub-division, in musical fractions of the host tempo (BPM)
Shape
The LFO offers the following choice of several classic as well as more esoteric waveforms:
sin |
sinewave |
tri |
triangular |
saw |
ramp, ascending |
saw - |
ramp, descending |
sqr |
square wave |
s|h |
sample and hold: jumps to a random value on every cycle |
s|h 2 |
variant of above that jumps a small random amount every sample |
chaos |
chaotic pattern, with a certain regularity |
chao5 |
another chaotic pattern |
chua |
chaotic waveform based on the Chua oscillator |
shot |
emits spikes a random intervals |
Target
Controls which parameter is modulated by the LFO, i.e. its destination.
-
freq modulates the cutoff frequency of the filter
-
pitch modulates the overall pitch of the resonators
-
gain modulates master gain for tremolo-style effects
Mod
Determines the amount of modulation applied to the target.
Direction
Determines how the LFO modulates the target parameter value
-
both modulates up and down, symmetrically around current value
-
up only increases the value
-
down only decreases the value
Envelope Follower
Usage
The envelope follower modulates the target parameter with the variations in amplitude of the incoming audio, to create various dynamic effects.
Controls
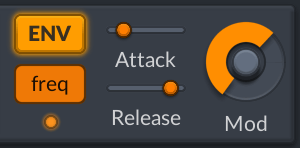
ENV
Clicking on the ENV button toggles the envelope follower on and off.
Target
This parameter sets the modulation destination, as in the LFO module.
When the EF and LFO targets are the same, their signals are combined.
Set target to gain to modulate output volume and achieve a gating / ducking effect. When set to freq, the filter cutoff frequency will be modulated by the incoming audio, as in an auto-wah pedal. You can also set this to pitch to mimic note bending, preferably using a small modulation amount, to avoid seasickness.
The little LED below the Target control displays the current output level of the envelope follower.
Attack
Controls the attack time of the detector, in seconds.
A short attack will make the envelope follow input volume variations almost instantaneously,
while larger values lead to a more pronounced swell effect.
Release
Controls the release time of the detector, in seconds.
A short release will make the envelope decrease rapidly to zero when input volume drops.
Decreasing this value will make the envelope hold longer following a short attack.
Mod
This controls the modulation amount.
Increase towards 100% to get a more pronounced effect.
A ducking effect can be achieved by setting it to a negative value and using gain as the target.
The sound will then be cut when the input gets loud, and come back in quieter passages.
Filter
Usage
The filter module is based on an analogue-modelled design, and can be modulated at audio rate.
It can be used to shape the tonal content of the effect, or as a modulation target to achieve more drastic effects.
Try mapping the filter cutoff frequency and Q to hardware controls to really play the filter live.
Controls
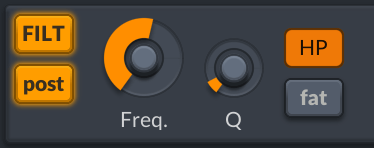
FILT
Toggles the filter section on and off.
Pre/Post
Switches between the two possible filter positions.
By default, the filter acts on the output of the resonators (post).
This setting gives the most dramatic results, especially when doing filter sweeps.
Try sweeping the filter with a moderate Q and listen how the resonator harmonics start to 'sing'.
The pre position puts the filter before the resonators,
which allows to tailor the frequency content of the incoming audio,
and therefore control which harmonics are being excited.
Frequency
This control adjusts the filter’s cutoff frequency, in Hz.
Q
Determines the quality factor, or resonance of the filter.
Low Q values give a mostly smooth curve, while higher Q values create a bump around the cutoff frequency.
Going all the way up to 1 will take the filter into self-oscillation territory.
Mode
The mode parameter determines the shape of the filter curve.
-
LP (low pass): progressively removes content above the cutoff frequency
-
BP (band pass): removes content below and above the cutoff frequency
-
HP (high pass): removes content below the cutoff frequency
Fat
The filter module can be switched between two different models. The default setting (off) should cover most needs, whilst enabling fat mode will imprint a subtly different character to the filter’s sound.
Saturation
Usage
The saturation module lets you add effects ranging from light tube-like warmth to heavy amplifier crunch and growl.
Controls
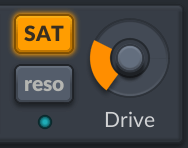
SAT
Toggles the saturation module on and off.
Reso/Post
When set to reso, the saturation module acts on the output of each resonator individually.
When set to post, saturation is applied to the summed output of all resonators.
You will notice that the two settings often produce notably different results. post mode simulates what happens when you feed a guitar’s pickup output to a distortion pedal and/or amplifier, creating complex harmonics, inter-modulation distortion, etc.
Drive
Controls the input gain of the saturation element, in dB.
Low values produce mild tube-like warmth, mid values will lean towards crunch and grit,
whilst extreme values give fuzz-like tones.
Output gain is compensated internally to maintain a constant perceived loudness.
Dynamics
Usage
In the real world, there is a certain limit to the amplitude of a string’s vibration. This is because a real string’s behavior departs from an ideal mass-spring, so it can only store a limited amount of energy before breaking. If you ever played guitar, you have most probably experienced this at least once by pulling or picking too hard.
The dynamics module models this non-linear aspect of a string, and also helps prevent the audio output from blowing up, for example at very small damping values causing infinite resonance.
You can think of this module as a special kind of compression device, although it acts on the total internal energy of each resonator, and not just on the output signal.
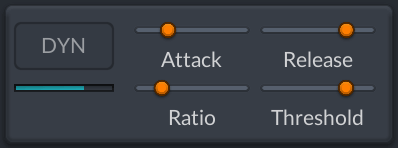
The dynamics module is always on to protect your ears and speakers.
At its default settings, the limiter is completely transparent with no gain reduction applied.
The small bargraph below the [DYN] label shows the amount of limiting applied.
Controls
Attack
Controls the delay before the energy limiter kicks in.
Setting this value to a few milliseconds will make the limiting act almost instantaneously.
A value in the order of several hundred milliseconds will let more of the peaks come through.
Release
Controls the time for the energy limiter to fall back to zero.
Ratio
Controls the slope of the limiter. The resulting dynamic range decreases with increasing ratio.
Threshold
Sets the value over which the limiter kicks in, in dB.
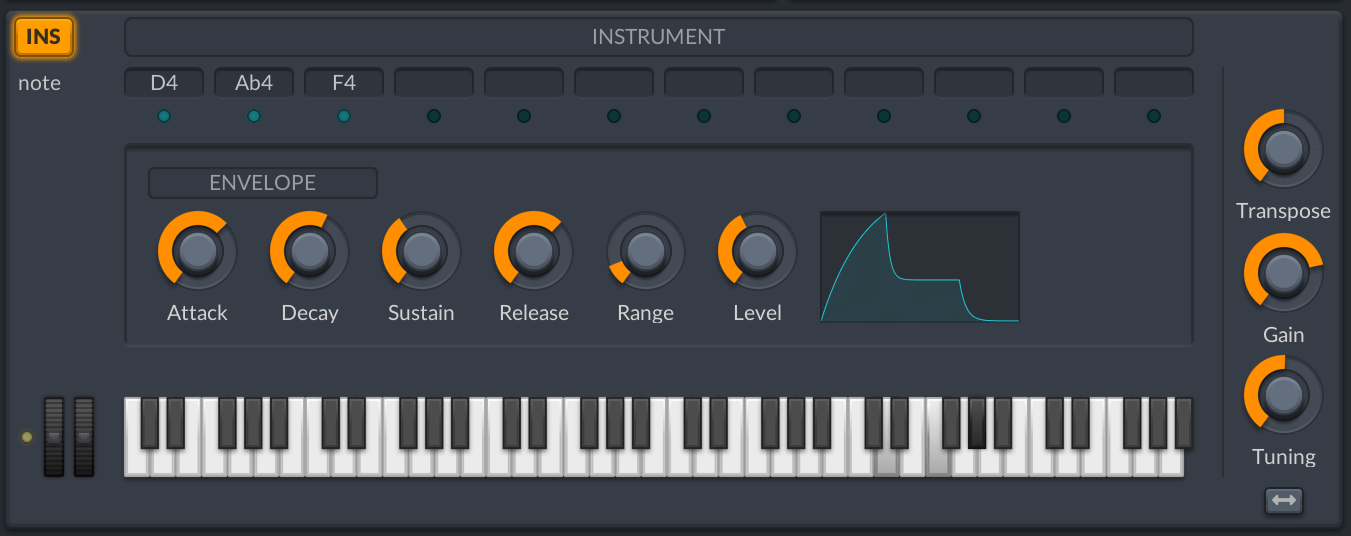
Instrument mode
Overview
Instrument mode is enabled by clicking the FX toggle button,
after which it will display INS.
In this mode the resonators are now controlled by incoming MIDI messages,
which allows you to play chords and melodies,
with the incoming audio still driving the resonators.
When you press a key, the next first available resonator is 'activated' and its pitch set to that of the incoming MIDI note.
Upon releasing the key, the envelope enters its release phase and the resonator is subsequently 'deactivated'.
|
In instrument mode, input audio is still needed to drive the resonators, so you’ll still get silence out if you feed silence in, as in FX mode. |
Host setup
Just as in FX mode, the plug-in should be inserted on the audio track you wish to process.
In addition, you will need to create a MIDI track and route it’s output to Superchord’s MIDI input.
Please consult the documentation of your host for specific details on how to do this.
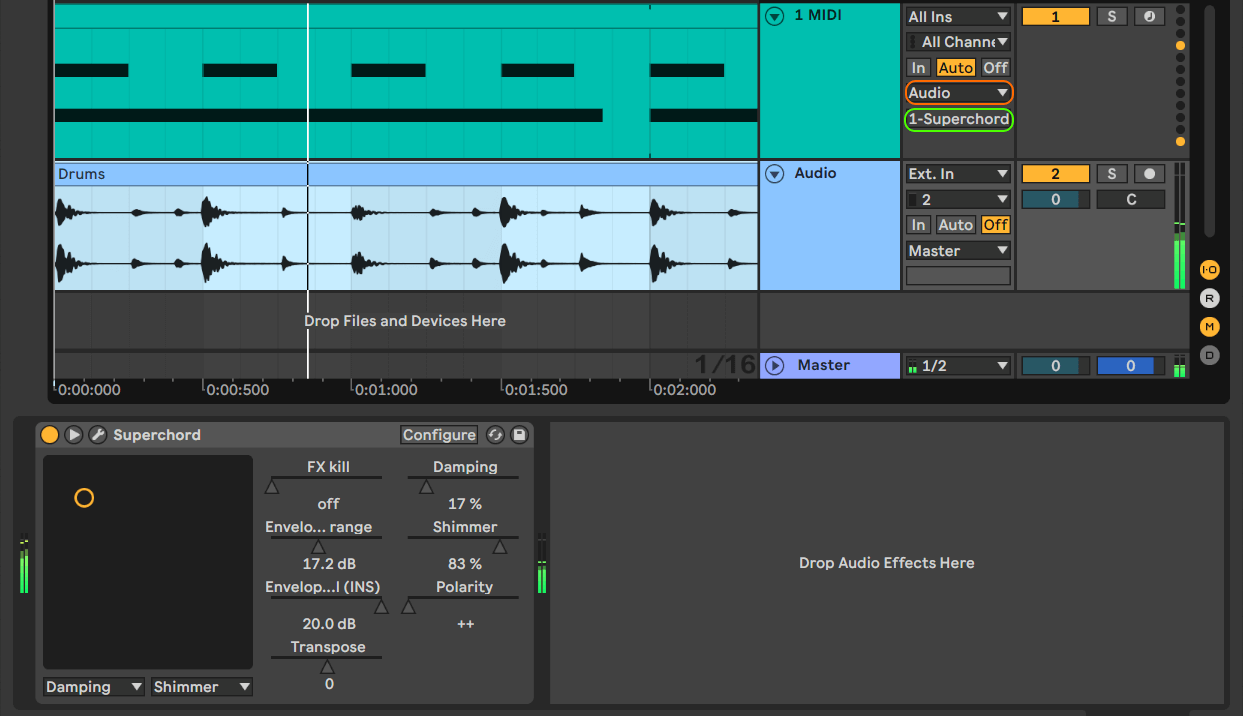
Ableton Live
-
Create an audio track and drop Superchord on it
-
Create a MIDI track and set it’s output to the aforementioned audio track (e.g Audio in the following screenshot)
-
Route it’s MIDI output to the Superchord MIDI input that appears below the audio track selector
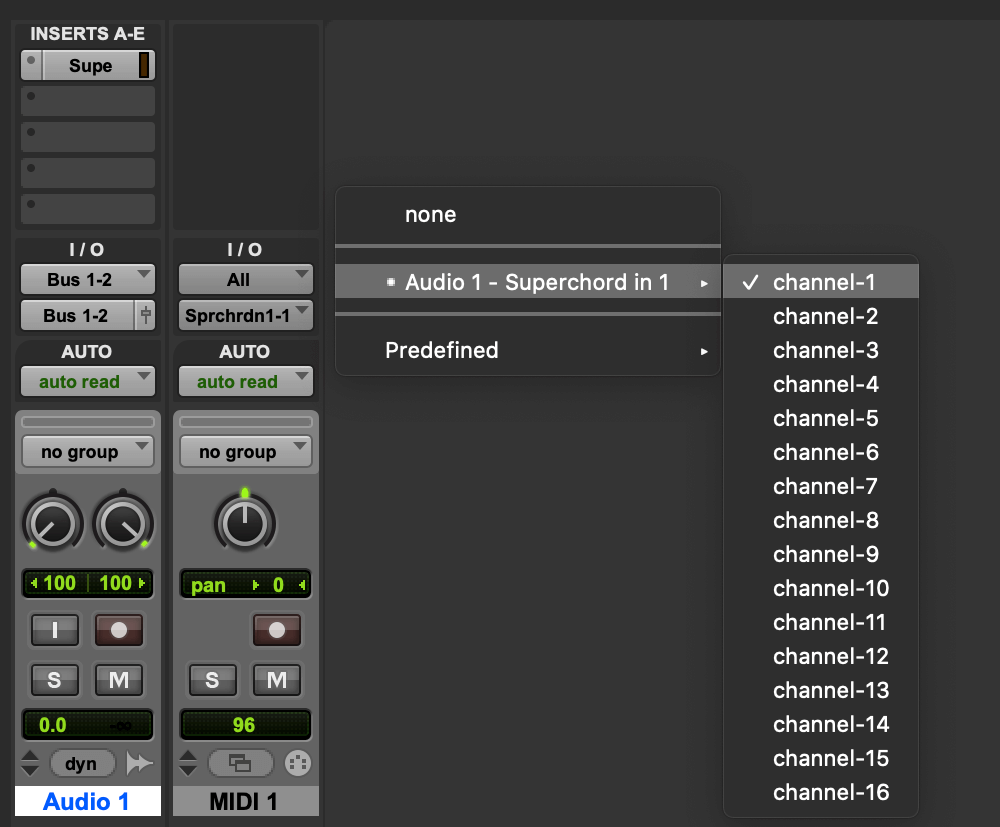
Pro Tools
-
Create an audio track and insert Superchord on it in the corresponding mixer channel strip
-
Create a MIDI track and assign its output to Superchord using any channel
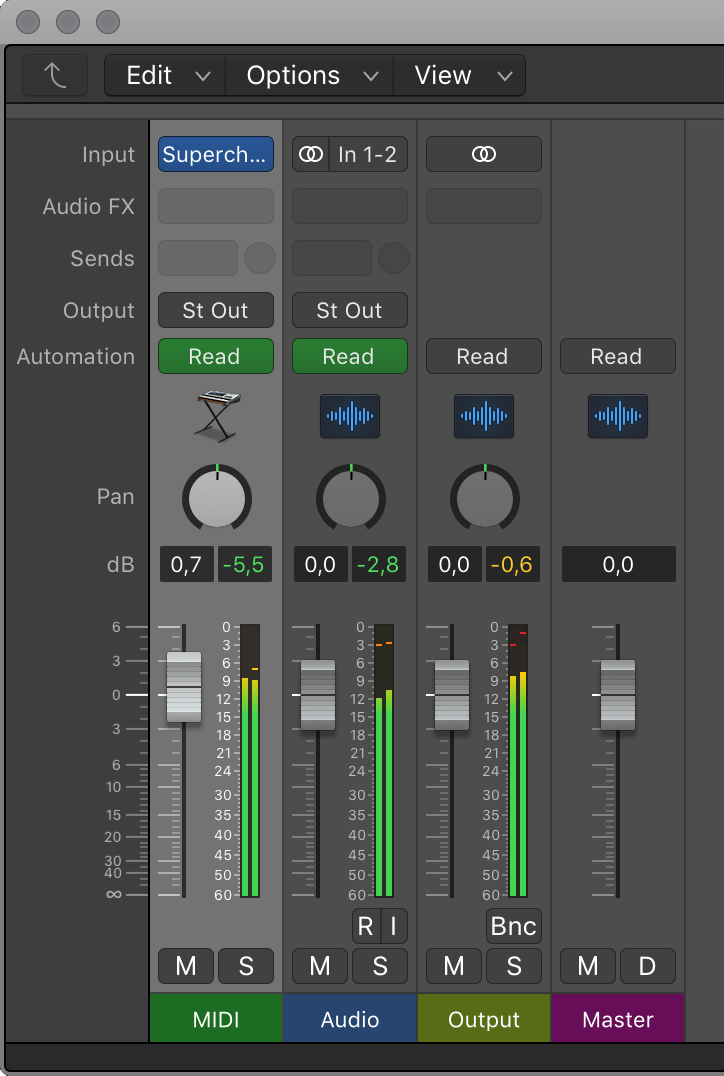
Logic Pro X (macOS only)
Logic Pro requires a somewhat specific setup. Please follow these steps:
-
Click on to create a new software instrument track
-
Go to the mixer and click on in the newly created track
-
Select in the drop-down menu
-
Open Superchord’s editor window and select the audio track to be processed in the Side Chain menu

Controls
Resonators
The instrument engine assigns incoming MIDI notes to free resonator voices.
Currently playing resonators are displayed at the top, with their corresponding note and level.
While most settings are shared with regular FX mode,
each resonator output is modulated by a VCA envelope generator, which shapes the evolution of its volume in time.
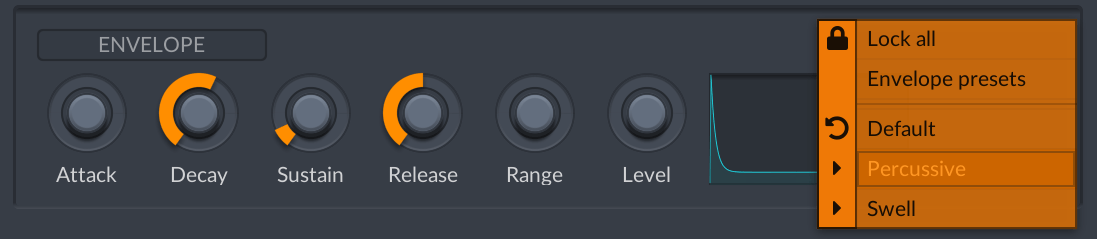
Envelope
The envelope is a classic ADSR generator as found on many synthesizers. The graph on the right side displays the volume curve applied to resonator voices.
Attack
Controls the rise time of the volume envelope, in seconds. A longer value here will lead to a gradual volume swell, which is suitable for pads and similar sounds.
Decay
Controls the decay time of the volume envelope, in seconds.
Sustain
Controls the sustain level of the volume envelope.
Release
Controls the release time of the volume envelope, i.e. the time for the envelope to fall back to zero after the key has been released.
Range
Controls the velocity dynamic range. Setting this to zero will lead to notes all having the same volume, irrespective of the incoming MIDI note velocity, as it happens in some organs.
Level
Controls the velocity to volume level scaling. Adjust this to a suitable value depending on your playing style.
Context menu
Right-click inside the envelope module panel to bring up a context menu with pre-defined envelope shapes.
Controllers
Pitch wheel
You can use the MIDI pitch wheel message to perform pitch bending and vibrato effects.
Playing tips
Try playing chord progressions on a keyboard or entering chords in your DAW’s MIDI editor, using rhythmic material as the incoming audio source. Listen how the rhythmic part imparts complex modulations onto the chords. Adjust damping to a medium value so the rhythmic changes can be heard, and play with the envelope settings to change from pad type to percussive sounds.
For a richer sound, duplicate the chords at various octaves above and below.
Take advantage of any included MIDI effects included with your DAW to quickly generate chord progressions. If you’re using Cubase, give the Chord Track and Chord Pads (since version 8) a try.
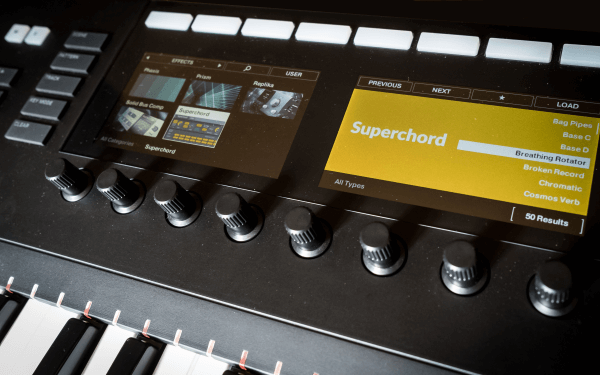
NKS
Superchord supports the Native Kontrol Standard (NKS) for seamless integration with NI’s range Komplete Kontrol keyboards and Maschine hardware.
All presets are tagged for quick filtering and auditioning,
and most parameters are mapped to a physical knob, arranged as logical sections distributed over 9 pages.
The first page is optimized for live performance, while the remaining are more suited towards experimentation and fine tuning.
A special preset named Sound Design contains all parameters mapped. It can be used when full control over the plug-in is required, or to help visually impaired users
Copyright
Superchord © 2008-2026 lmdsp.
No part of this documentation may be reproduced or transmitted in any form by any means, electronic or mechanical, including photocopying, recording, or any information storage and retrieval system, without written permission from lmdsp.
|
|
|
|
|


VST is a trademark of Steinberg Media Technologies GmbH.
Native Instruments, NI, and associated logos are registered trademarks of Native Instruments GmbH.
Microsoft, Windows, and the Windows logo are registered trademarks or trademarks of Microsoft Corporation in the United States and/or other countries.
Apple, Mac, Mac OS, macOS and Audio Unit are trademarks of Apple Computer, Inc., registered in the U.S. and other countries.
All other trademarks and logos from these or other manufacturers written or shown on this documentation are property of their respective holders.